1 1/2" Inch Double Jacket Discharge Hose has been added to your cart.
Quantity: 1
November 29, 2023
Caulking around grab bars in a shower is not mandatory; however, it is highly recommended for several reasons:


In summary, caulking around grab bars in a shower is a simple yet effective way to improve safety, prevent water damage, and enhance the aesthetics of your bathroom. While not always required, it’s a worthwhile step to ensure the long-term functionality and security of your grab bars in a high-moisture environment.
Here’s the process of caulking around the edges of grab bars, focusing on the key steps for a successful application:
Clean the surface: Clean the area around the grab bar and the wall thoroughly. Remove any dirt, dust, soap scum, or oil using rubbing alcohol or a commercial bathroom cleaner. Ensure the surfaces are completely dry before caulking.
Apply masking tape: For a clean finish, apply masking tape around the edges of the grab bar, creating a neat border for the caulk. Leave a slight gap between the tape and the bar to allow for the caulk application.
Cut the sealant tip: Using a sharp utility knife, cut the tip of the silicone sealant cartridge at a 45-degree angle. The opening size should be slightly larger than the width of the gap you need to fill (typically around 1/8 inch).
Load the caulking gun: Insert the silicone sealant cartridge into the caulking gun, following the manufacturer’s instructions.
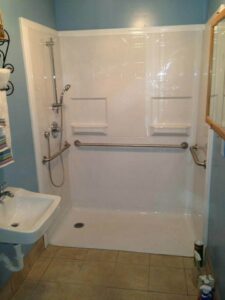
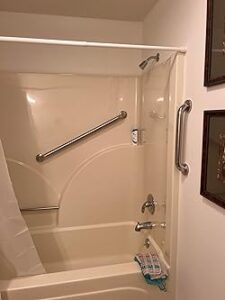
Apply the caulk: While holding the caulking gun at a 45-degree angle, apply the caulk in a steady stream, filling the gap between the grab bar and the wall in a continuous bead. Aim for even pressure and avoid creating air pockets. It’s important to note that you should only apply the silicone sealant around the top half of the grab bar flange cover. If you seal the bottom of the flange cover, there is a possibility that water could still get behind the grab bar and if the bottom of the flange cover is sealed, this would prevent the water from being able to drain.
Tooling the caulk: Use a caulk finishing tool (or your finger dipped in soapy water) to smooth out the applied caulk. Draw the tool along the bead to create a clean, even surface and ensure good adhesion.
Remove excess caulk: Wipe away any excess caulk that might have gotten on the grab bar or surrounding tiles with a damp rag before it dries completely.
Remove masking tape: Carefully peel off the masking tape while the caulk is still wet to prevent tearing and ensure a clean line.
By following these steps carefully, you can effectively caulk around your grab bars and create a watertight seal that enhances both safety and aesthetics in your bathroom.

Silicone sealant is the recommended type of caulk to use in showers and bathrooms for several reasons:

Overall, the best and easiest way to ensure your shower grab bars are their most secure and durable is to apply a silicone sealant around the upper half after they have been professionally installed into the tiles or shower wall. The silicone sealant will block out any moisture from getting behind the flange covers. If you do not seal around the upper half of your grab bar, water will get behind the flange covers, sit there, and begin to rust the stainless steel grab bars over time. This would then require you to replace the damaged grab bars.
We have also written comprehensive grab bar installation guides to illustrate grab bar installation on various wall surfaces and behind wall anchoring configurations (wood studs and hollow walls). Check them out here:
Check out all of our bathroom and shower grab bars here: Grab Bars
You can also find the recommended silicone sealant for caulking here: Silicone Sealant
If you need help finding a professional to install grab bars, we’ve made it super easy for you! Just fill out this Grab Bar Installation Request Form and within a few hours one of our installers from our network of over 500 independent professional grab bar installers across the United States will get in touch with you.
If you have any additional questions about caulking around shower grab bars or need help deciding which grab bar is right for your bathroom, email us at [email protected], live chat with us on GrabBars.com, or give us a call at 704-800-4629 and we’ll be happy to help.
