1 1/2" Inch Double Jacket Discharge Hose has been added to your cart.
Quantity: 1
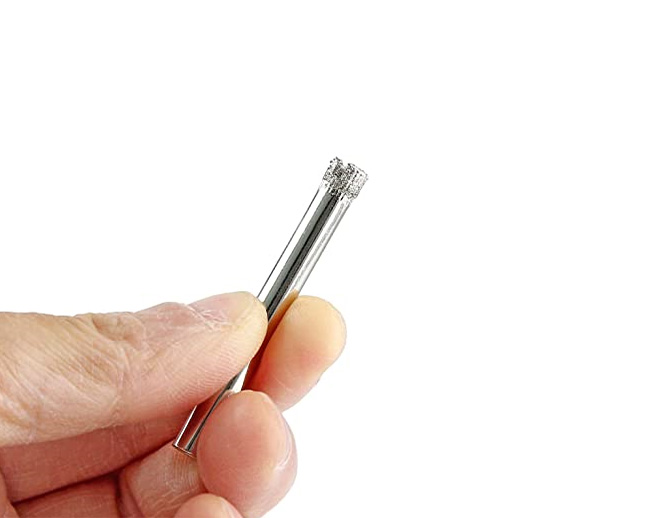
This drill bit is required for installation of grab bars on Tiled Walls into Wood Studs. This is NOT compatible with the Toggler Anchor Kit or the Solid Mount Anchor Kit.
Each Kit Contains:
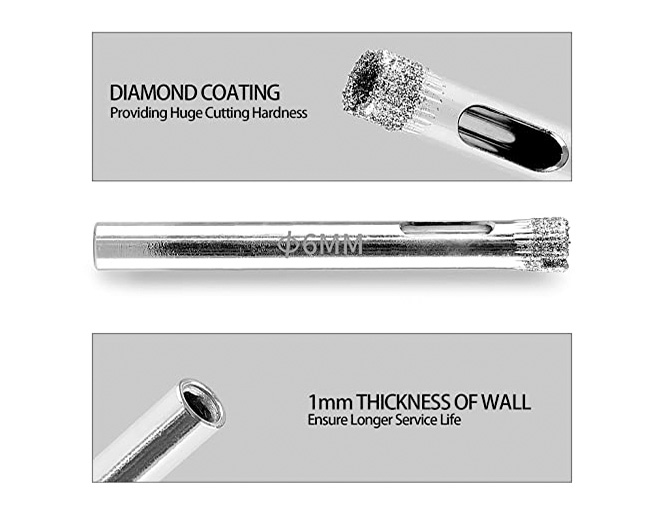
*On average, each drill bit will last between 1-15 holes drill holes each. Drill bit longevity is determined by the hardness of the surface material (the harder the material, the quicker the bit will wear out) and the temperature of the drill bit during use. You can easily extend the lifespan of each drill bit by using plenty of water lubrication to cool the drill bit, drill at a slower speed, apply lower pressure to the drill, and begin the drill at a 45 degree angle.
Intended Use:
DO NOT USE ON CONCRETE OR METAL! The drill bit will bend and snap.
Requirements (MUST READ):
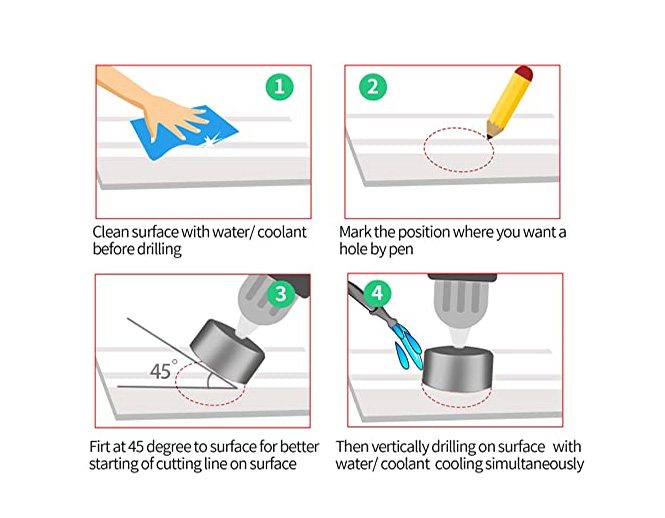
Installation:
🎥Watch Related Installation Video #1
🎥Watch Related Installation Video #2
Specifications:
Important Feedback / Reviews from Satisfied Customers (A Must Read):
“The drill bits will become dull with time. Time is determined by the material you’re drilling and whether you use lubrication or not. Be patient and take your time especially if you’re new to this. Your patience will pay off with the results. Lubricate when drilling. This will increase the life of your bit by reducing heat, dust particles and results in cleaner cuts. Start drilling at a 45-degree angle and slowly adjust to 90 degrees as the bit starts to cut into the material. Apply very little pressure and let the saw do the cutting. Keep in mind that with every hole you drill, the bit becomes more dull. As the bit becomes more dull, I had to increase the pressure by just a little. As a bit became more dull, I had to use both hands on the drill to start the bit to cut into ceramic material. Once the bit started cutting, only one hand was needed. The other hand was back with the spray bottle. To further stretch the life of my bits, I used the smaller diamond bits from the local budget hardware store to make a smaller hole and then finalize/increase the size of the hole with diamond bits. As of this writing, I’ve only used one bit and it’s not fully spent yet.”
“The bit broke, but that’s because of improper use. It was my first time drilling with a diamond bit. My dad referred to it as “dancing”, I put too much pressure trying to get it to stay put… but the trick is to “scale” it & start at an angle until you make enough of indent & then straighten it out. Don’t put a lot of pressure! Once I did this, these bits worked beautifully from then on out & I was able to drill through ceramic that I wasn’t able to do with another diamond bit that wasn’t hollow. I definitely recommend!”
“This bad boy made mincemeat out of 3/8” thick porcelain tile and 3/8” thick mortar all at once. Just keep dipping it in ice water and go moderately fast/slow. Develop the technique of starting the cut by laying a portion of the blade on the target material and make a semicircle first and let it grab before standing the bit straight up.”
“I spent $100 on 6 bits from two different box stores and barely made it through 5 holes that took 5 hours to drill in porcelain. I took a chance on these bits and were they worth it! I bought two orders thinking I would need all of them but I was wrong. One bit made it through in one minute and drilled multiple holes. Buy them!”
“Excellent tool! Cut was clean even thru ceramic and porcelain!”
“I used these to drill holes in porcelain tile. Don’t go too fast, use water frequently, and apply moderate pressure. I bent a bit with too much pressure and got only one hole from it. The other bits were good for two or three holes with some patience. No way they’d last six holes in porcelain tile, but at this price I didn’t mind replacing the bit after 2-3 holes.”
“Works very good must use water as a lubricant for a longer life. It will cut dry but won’t last as long.”
“Nice bit, easy to use and cut 2 holes through porcelain tile with ease. Made template by tracing bit onto thin plywood which I clamped to tile. Keep bit wet during use.”
“Did a nice job cutting a perfect chip free hole through a couple of tiles. Not sure how many more holes it will be good for but for the price it did what I needed it to do.”
“Don’t mess around with any other more expensive or higher “rated” brand. Performance and price are unmatched. Cut through 12×24 porcelain tile like butter!”
“I had never cut marble before, but this made it very easy. I used a wood template to hold the hole saw in place since this has no centering bit. It easily cut a clean hole through 1/2” marble.”
| SKU/Model # | Diameter | Length | Finish |
|---|
| SKU/Model # | Diameter | Length | Finish |
|---|